By their hands is an art and design education blog. This is a place where student’s work and processes are shared and discussed. It is a place of reflection and innovation, where ideas for lessons and learning can be kicked around and fine-tuned. The ambition of this blog is also to discover tools and resources for teaching art and design using both traditional and digital media. It might also be a place where we boast a little!
Monday, April 16, 2012
Brand New Blog
This is a brand new blog that will be chronicling the processes of designing an art lesson plan, executing that lesson plan and reflecting on its successes and failures as told through the eyes of an art & design educator. Which means it will include evaluations on what to keep, what to throw away and what needs a tiny bit of tweaking. It might even include, what was the inspiration, what was borrowed, what the applications could be for extending the projects, what the students thought, and what's next. It is an overhaul of a blog that I kept as a graduate student at Pratt Institute in Brooklyn, NY. Let me take a moment to introduce myself, in case you heaven't read my bio yet, Hello! My name is Alessandra Cirillo, I currently teach after-school digital design classes for 10-13 year-olds at my alma mater, Pratt Institute. Now that I have ventured out into the real world of teaching art/design, I can see so clearly how important it is to think back on the activities of the class-time and the whole day, and to constantly self-reflect. This blog will be a place for me to do that. I also hope it will be a space to explore new ideas and share with others like myself, and perhaps the community at large.
Wednesday, December 8, 2010
Musings
Reflection
Materials
One of my biggest concerns for when I actually teach full time is materials. One of those concerns involves technology, and the availability of a computer and a digital projector...etc. Where you land, what type of school and budget you have will dictate what your resources are. This semester I feel that we used materials that were most readily accessible and inexpensive, and we managed to produce a lot of sophisticated work. We also used technology sparingly—barring the alphabet primers—and that was great. We used a lot of paper and paper-based products. I appreciated the different ways that I began to think about paper as a surface, and not as a container or deposit for drawings and prints. The tyvek was a real eye-opener in this regard. Book making was not something that I had done in my personal work, or as a student before. I found the bookmaking to be inspirational, personal, and much easier to accomplish than I previously thought. I also thought that both times we used recyclable and accessible materials, such as construction paper, and plastic bags. During the printmaking unit, again, instead of using linoleum, or copper or zinc etching plates, we used card-stock and cardboard, and a drawing on paper to produce some very convincing prints. This gave me great hope and inspiration for when I am at a school with a potentially limited budget. The sculpture unit embodied this practice as well. What is more accessible than cardboard and tape? When I think sculpture, I think construction, weight, balance....and I wonder how much time I could potentially spend assisting students to get some thing to "stand" or "hang" and not topple or fall apart. I think heavy things like clay and plaster, and metal....Our sculpture unit was very liberating and light and so satisfying because it contradicted my feeling about sculpture in the traditional sense.
Themes, practices, and concerns of contemporary art and design:
I cannot talk about materials and not talk about techniques: every time that we approached a new project there was a 360 degree approach to the way that we had several ways to arrive at the same results, and we able to see how something might have turned out differently had we used a different material in a way that doesn't happen when you choose just one material. An example of this would be the alphabets. This is one practice that was brand new for me, and very helpful, I also like the ways in which the different materials work with each other as a final piece: like the letters, or the folio of prints all done in different techniques. The use of themes is not new to me, in that Pratt stresses thematic unit planning in foundation. But this class used themes brilliantly. The themes wove the weeks of work together seamlessly, and aided me in producing a lot of work that didn't come from my toiling over an idea. I enjoyed the typography theme because it tapped into my life as a graphic designer, and my love of type, but allowed me to be much more aesthetic and artistic with the content. I really enjoyed the creatures theme, because it was very playful, and tapped into my love of cryptozoology. Concerns for temporary art and design: This class was so helpful with regard to learning about so many artists I have never heard of before, and having the blog entries as a record of learning about them is such a useful tool. I will continue to check in with fellow bloggers and Aileens blog to keep up with artists that others are talking about.
Visual Resources:
BOOKS, MAGAZINES, WEBSITES, BLOGS, THE PROJECTORS digital and overhead, THE STUDIO SPACE walls, ceilings, clothing lines, window, hallways, stairwells, COLLEAGUES... any and every way to provide visual stimulus was covered in an effective way during this semester, there was always a way to stimulate a response with reference materials and this became obvious to me as not only a practice but a necessity, especially when a teacher wants to set a pace.
Instructional Strategies:
I may have touched upon the instructional strategies in all the other categories already. I think the stations was a learning curve for me, and a great approach for strategy, in combination with collaborative work. The cooperative learning groups is also a great construct for creating an effective working environment. Keeping a sketchbook / and / or a blog is a great strategy for keeping the juices flowing.
How can I take this into my own studio work?
Not how, but what? Everything! My studio work is very digitally based, although I paint, illustrate and design jewelry, I limit materials for myself. There are processes that I avoid in my studio at home because of my preconceived notion that they will involve buying expensive materials, or teaching myself processes that I do not know, and so I default to the familiar.
How can I take this into my work with children and adolescents?
Our very last discussion involved how to arrive at sophisticated results with adolescents, and how giving them the proper materials and procedures takes away the pressure for those students who are insecure about their artistic abilities. The aspect of this class that taught me, or reaffirmed for me that process IS the exploration that yields convincing results, is a very solid thing that I will take into my work with children. I have a tendency to over intellectualize things sometimes, and I know full well it can trip me up when planning and executing a lesson. Constantly referencing the work of others, is another thing that I will take with me. Collaborative work, bookmaking as continuity in combination with other work, and use of light and shadow and space to create a feeling of place and a stimulating environment. Lastly the use of the sketchbook and blog to observe myself withing the context of my classroom as a tool for planning.
November 30, 2010
I arrived at class an hour late due to traffic, and was very, VERY behind in the sculpture unit. We were to stay in our groups from last week. I joined-up with Chelsea and Alana who also had been a little behind due to absence. I was able to partake in the tape-casting, and lashing with cardboard strips. This is the result of our tape-casting (courtesy of Alexandra Gerbe) I think students would be very excited about altering their familiar spaces with these impermanent installations.

I missed being able to make an observational drawing of the ball shapes placed on a table. I almost deliberately put it off, because I wanted to be able to work in 3D, which is not typically how I work. The collaboration and installation of our pieces is what made this unit so exciting. Again, I am always remarking at how immediate these things can be for students if I handle the lesson in the same way that we experienced it. What I really like about Media & Materials is the structure for the way that we arrive at our content, and how instantly producible a final piece is for many of our exercises.
I felt that the stations for this project had a whole new DNA. For some reason I had a totally different experience with these stations because we didn't have to scramble for the same inking area or tool. I didn't feel like I was in line, or had to be assertive to get my work done or rush to accommodate another student. This was an important lightbulb moment for me as far as what types of stations work with different media. Not that I didn't agree with the printmaking stations, in fact, I think it makes the most sense to have a standing-up-and-moving-around rotation when printing.

Alana, Chelsea and I had a lengthy conversation about using Christmas lights within our tape spheres. There is something about the translucency and texture of these objects that lends itself to thinking about light. I viewed several classmate's blogs and realized that I might have missed the discussion on this very topic with Aileen. (see photo left courtesy of Romina)
Tuesday, December 7, 2010
November 23
I missed this class, and received notes from Clare Hilger, which were very helpful,
as I was able to finish my melted plastic book cover at home (see bottom). The following is my notes on her notes, my notes are in purple:
We began with talking about our blogs:
- We are supposed to look at our blogs, really refine them, make them
- meaningful—a meaningful piece of studio work, take your blog to a “new
- place.”
- Our last blog entry will be a reflection
- You can talk about your final project as a jumping –off point
I regret that I do not have, or have not made sufficient time with my blog over the course of the past couple of weeks. I really have felt that this blog journaling can be most helpful in a classroom situation while I am teaching as a place of reflection and review and collaboration.
Mentioned artistVisited this link, would be interested in knowing what the discussion on it was.
Mathew Barney & “Restrained Drawing”
- The luxury of changing your mind at the last minute for a different or better idea
What is that expression about the best laid plans? I think that teaching is subject to an ever-evolving formation of ideas that is constantly influenced by the pace and attitudes of both the teacher and students. When I student taught, my lessons had evovlved away from their original intent, and the students carved out the new avenue that he projects took.
We then had a critique on sketchbooks that was intended to be a discussion
about what you are planning on doing for your final project. We looked at
each person’s sketchbook and talked about his/her idea.
Some of the things people are thinking of for final projects include:
- book of prints & collages
- monoprint & drawing on fabric
- Installation based on black and white drawing
- painting combined with some embroidery
- casting or 3-D relief with paper mache
- “rain machine”
- large accordion book with stencil paintings
- book that might be a pattern for model (as in a children’s toy model)of
- a certain place
- stop-animation drawing with charcoal
As I discussed with Aileen, I think my final project is going to jump off from a sketchbook entry that I made, that involved a collage and painting technique. It was dependent on some vintage black and white line art. I may combine this idea with our monster unit, to create some fantastical creatures and their environments.
Some artists mentioned during the critique included:Arturo Herrera
This artist is actually a great reference for some style and painting techniques for my final project, particularly with the layering and collage.

- Tim Hawkins....
- Tim Knowles

There is something so magical about this artists work. I have never heard of him before and so I looked up this reference, when I read the following paragraph about how this piece was created, I thought it had a very enchanting quality about it.
"Drawings produced by pens attached to the tips of tree branches, as the branches move in the wind the tree draws on to a panel or drawing board on an easel. Like signatures the trees drawings tell of the tree's character." 
I am wondering if these artists were brought up in discussion for some of the ideas for final projects...I loved this quote about Ana Mediata's earth-body art pieces.
“I have been carrying on a dialogue between the landscape and the female body (based on my own silhouette)… I am overwhelmed by the feeling of having been cast from the womb (nature). Through my earth/body sculptures I become one with the earth… I become an extension of nature and nature becomes an extension of my body…”
Aileen quickly talked about the different ways to make structures.
Mentioned artist Buskminster Fuller and his repetition of shape and
geodesic domes

Buskminster Fuller—"invention often occurs when individuals, frustrated by circumstances, try to transform their environment rather than to reform human nature."
I wish I could have been there for the introduction to the sculpture unit....
I very much wanted to so the stop-motion, since Ive never done it before. I like the simplicity of moving the straws, and not generating content for the students, I think the results are so immediate.
There were 3 “stations”:
- Lashing—out of long cardboard strips, tape staples and bamboo to make a
- large sphere shape
- Reverse take casting—using clear packing tape, different sizes of balls
- (basketball, soccer ball, etc.) were wrapped once with sticky side of tape
- facing up, then wrapped several times with the sticky side down. Ball is
- then carefully removed from wrapping
- Clay stop-animation—given a hunk a clay, some black paper, digital
- camera, tripod. Told to make a ball and have it come apart somehow and
- then back together again
We do have some homework:
To bring to our next class, the beginnings of a final book form,
specifically made out of plastic shopping bags.
Aileen did a quick demonstration, I took notes, hopefully they are clear.
Materials needed:
- 3 plastic shopping bags (the kind you get at the grocery store)
- wax paper
- iron
- newspaper
- scissors
Heat iron to coolest setting (sometimes the "silk" setting)
With scissors chop the top (handles) and bottom off of each bag so that
you are left with a rectangular-ish shape.
Fold each bag 3 times, stack the 3 folded bags
Put newspaper down first on a table, then the folded bags, then wax
paper--iron.
The layers will start to melt together. Flip bags over and iron other
side--always have a layer of wax paper on top of the bags. Ironing the
bags without wax paper will destroy your iron. Repeat process until the
bags have all melded together.
After ruining the first three that I did because the waxpaper melted right onto the plastic, I went into the kitchen to get my parchment paper, and that did the trick.
Also, bring in paper for the pages of the book.
12 pieces of drawing paper (not too heavy weight), sized 7" x 12 3/4"
November 16th
Printmaking Continued
This class was about being able to continue the printmaking processes, while adding extensions onto the processes that yielded different printing formats. One of those extensions was bringing our plates over to the xerox machine to make transparent stickers of our prints. I love this idea. I love working with layers and transparency. Some of our classmates had plates that yielded really unique renditions of their collograph prints. Because my collograph wasn't too terribly successful, I didn't like the results for my stickers, but was very happy to add this process to my file on extending projects.
 We looked at the artists Terry Winters and Nancy Spero to see the ways in which this media is used. I love street art, but grappled with the sense of permanence when thinking about how to teach it and when broaching these topics with students. I like the idea of using the transparent stickers for street art projects, and would love to be able to figure out if you could print large format with the same materials.
I really like the idea of stations, I think it gives students a sense of independent studio work, but I had a hard time myself, waiting at each station, and not completing some of the work that I wanted to complete, because I went from station to station and there was a bit of a wait at each. I would like to come up with a few scenarios to address that problem before using it within my classroom.
The list of printmaking terms, and the quiz-like worksheet where we defined: brayer, inking up, pulling a print, charging a brayer, a proof, an edition, collagraph, relief printing, handmade paper, rag edge, tearing prints and signing—is a great way to review the terminology fro the processes, and throws a little literacy into the printmaking process.
The class ended with a discussion on our Dystopian graphic novels and related materials. I like the idea of doing a collection of work, or a collaboration of work, with a class that culminates in a book. I also like the giant collaborative monoprint, I think building upon something like that with a whole unit on printmaking might be a great continuity project.
This class was about being able to continue the printmaking processes, while adding extensions onto the processes that yielded different printing formats. One of those extensions was bringing our plates over to the xerox machine to make transparent stickers of our prints. I love this idea. I love working with layers and transparency. Some of our classmates had plates that yielded really unique renditions of their collograph prints. Because my collograph wasn't too terribly successful, I didn't like the results for my stickers, but was very happy to add this process to my file on extending projects.

I really like the idea of stations, I think it gives students a sense of independent studio work, but I had a hard time myself, waiting at each station, and not completing some of the work that I wanted to complete, because I went from station to station and there was a bit of a wait at each. I would like to come up with a few scenarios to address that problem before using it within my classroom.
The list of printmaking terms, and the quiz-like worksheet where we defined: brayer, inking up, pulling a print, charging a brayer, a proof, an edition, collagraph, relief printing, handmade paper, rag edge, tearing prints and signing—is a great way to review the terminology fro the processes, and throws a little literacy into the printmaking process.
The class ended with a discussion on our Dystopian graphic novels and related materials. I like the idea of doing a collection of work, or a collaboration of work, with a class that culminates in a book. I also like the giant collaborative monoprint, I think building upon something like that with a whole unit on printmaking might be a great continuity project.
Tuesday, November 16, 2010
November 9th, 2010
Printmaking Continued
The first thing I would like to highlight from this class is how fantastic it was to have created three different plates for three different processes—and printed them all—before the end of class. This was because the structure behind arriving at the imagery for the plates was so clever and yet so simple while yielding very "convincing" results.
I put this word in quotes, because it keeps coming up in conversation in class. Sometimes students can get caught up in the ideation behind their work, I certainly do it myself. Letting the process take over to arrive at a convincing image is a great way to coax great work out of those that aren't secure with their creative abilities, and a perfect method for printmaking.
 This week's collagraph was much more successful for me, and I think it might have been at how I arrived at this image. It was the not knowing. And yet, of course when the prompt "most interesting legs" and "scary teeth" are given, conscious thought takes over, but there is still enough of an abstraction here, that I don't think it speaks directly to "monster" it is also convincing as an abstract design, as were the others in class.
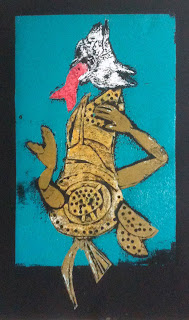
 "The Paul Klee Method" was a real treat because although I love the ease and clean-up of water-based inks, I prefer the quality of oil-based inks. Even though this piece looks dark and heavy, the quality of the ink, and the haze you get around your lines adds to the other-worldliness of the theme of creatures. This process was meant to be a mono-print, but because I was unfamiliar with it, I ended up doing two versions for the experience.
The third process with the corrugated cardboard was probably the least successful for me, and yet I loved the pieces that the other students produced.
I thought that the chunkiness of the pattern lent itself to big round shapes, and so I went for a Hippo, but the other students got these very elegant, thin -lined animals "convincingly" out of this material.
 I would like to try this process again, but on a larger scale. This process worked the least successfully with the create-as -you-go approach to arriving at a plate. Maybe, again, because it was the least abstract, and the most dependent on my ability to replicate what looks like a real animal, without the benefit of too much detail!
The first thing I would like to highlight from this class is how fantastic it was to have created three different plates for three different processes—and printed them all—before the end of class. This was because the structure behind arriving at the imagery for the plates was so clever and yet so simple while yielding very "convincing" results.
I put this word in quotes, because it keeps coming up in conversation in class. Sometimes students can get caught up in the ideation behind their work, I certainly do it myself. Letting the process take over to arrive at a convincing image is a great way to coax great work out of those that aren't secure with their creative abilities, and a perfect method for printmaking.


The third process with the corrugated cardboard was probably the least successful for me, and yet I loved the pieces that the other students produced.
I thought that the chunkiness of the pattern lent itself to big round shapes, and so I went for a Hippo, but the other students got these very elegant, thin -lined animals "convincingly" out of this material.

November 2, 2010
This was the first class back for me in two weeks (as I missed the 19th, and we didn't have class the 26th). Mary was substituting, and she began our printmaking/monster unit. Although I took many years of printmaking before college, the process of teaching printmaking is completely different and challenging, and one that requires precision planning. I have only taught printmaking to 7 year-olds, and watching both Mary and Aileen's methods of preparing of the stations for printmaking is very VERY helpful. Especially because the process could go from smooth to chaotic in a heartbeat without proper flow in a class with many students.
This class was very relaxed and used one of my favorite printmaking techniques, the collagraph. I love this technique because of the relief quality in the prints, and the ease and accessibility to the materials.
I ALSO LOVE THE THEME OF MONSTERS, boy is this right up my Ali! (alley) Having the books that Mary brought was great for inspiration, because all great imaginary things really come from a conglomeration of known things...and so to inspire creative thought for monsters and creatures, looking at real drawing and photos, inspired quick and creative solutions, so that time could be spent on the printing process. I didn't end up with a successful print, but that inspired me to keep at it during my own time, to be prepared for glitches in the classroom.
There is also something to be said about the collaborative prints that we did(seen here). I think this could be a great exercise in two things for students. 1) Collaboration 2) Impermanence. The process of creating a plate and then cutting it up to see how it might work in other ways, is very liberating and takes away the preciousness of work that a student (me) might be frustrated with.
 What is so funny about the creature conglomeration was that for my sketchbook a few weeks back, before I started my graphic novel, I was playing around with Photoshop creature collages as characters for my Dystopian story. I ended up with humans in my story (pictures to come), but initially I created this little guy as a model for my character.
This class was very relaxed and used one of my favorite printmaking techniques, the collagraph. I love this technique because of the relief quality in the prints, and the ease and accessibility to the materials.
I ALSO LOVE THE THEME OF MONSTERS, boy is this right up my Ali! (alley) Having the books that Mary brought was great for inspiration, because all great imaginary things really come from a conglomeration of known things...and so to inspire creative thought for monsters and creatures, looking at real drawing and photos, inspired quick and creative solutions, so that time could be spent on the printing process. I didn't end up with a successful print, but that inspired me to keep at it during my own time, to be prepared for glitches in the classroom.

There is also something to be said about the collaborative prints that we did(seen here). I think this could be a great exercise in two things for students. 1) Collaboration 2) Impermanence. The process of creating a plate and then cutting it up to see how it might work in other ways, is very liberating and takes away the preciousness of work that a student (me) might be frustrated with.

Subscribe to:
Posts (Atom)